E13 | Suburban Victorian | Pouring It On
Season 47 Episode 13 | 23m 42sVideo has Closed Captions
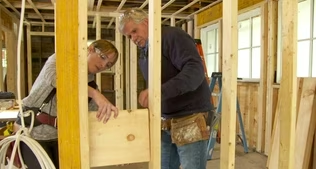
Kevin and Tom carefully remove kitchen cabinets for use in a new pantry.
Kevin O'Connor helps Tom Silva salvage kitchen cabinets for a new pantry. Outside, Charlie Silva and Mark McCullough demolish the chimney from top to bottom. Kevin meets architect Marcus to learn how removing the chimney adds space and reshapes the layout. Out back, Charlie preps for the foundation pour of the addition and explains the need for a retaining wall before cutting a basement doorway.
Problems playing video? | Closed Captioning Feedback
Problems playing video? | Closed Captioning Feedback
Funding for THIS OLD HOUSE is provided by The Home Depot and Renewal By Andersen.
Support provided by:

E13 | Suburban Victorian | Pouring It On
Season 47 Episode 13 | 23m 42sVideo has Closed Captions
Kevin O'Connor helps Tom Silva salvage kitchen cabinets for a new pantry. Outside, Charlie Silva and Mark McCullough demolish the chimney from top to bottom. Kevin meets architect Marcus to learn how removing the chimney adds space and reshapes the layout. Out back, Charlie preps for the foundation pour of the addition and explains the need for a retaining wall before cutting a basement doorway.
Problems playing video? | Closed Captioning Feedback
How to Watch This Old House
This Old House is available to stream on pbs.org and the free PBS App, available on iPhone, Apple TV, Android TV, Android smartphones, Amazon Fire TV, Amazon Fire Tablet, Roku, Samsung Smart TV, and Vizio.
Keep Exploring

This Old House Insider Newsletter
Get This Old House exclusive stories, tips, and behind-the-scenes information delivered right to your inbox every month.Providing Support for PBS.org
Learn Moreabout PBS online sponsorshipKevin: Today on "This Old House"... Tom: I'll show you a few tips on removing kitchen cabinets that are going to be reused.
Then, we're gonna remove this chimney from top to bottom, brick by brick.
Charlie: You realize there's 3 1/2 stories of brick here, right?
Mark: That's right.
We're gonna need a bigger boat.
-Charlie: A boat?
-Mark: A dumpster.
Charlie: That makes more sense.
[ Blues music plays ] Man: Got it?
♪♪ Man: Ahh.
That's it.
♪♪ [ Pipe squeaking ] [ Power tools whirring ] [ Rock music plays ] ♪♪ ♪♪ ♪♪ Kevin: Hey.
Good morning, Charlie.
-Charlie: Hey, Kevin.
-Kevin: Hey there.
Welcome to suburban Needham, Massachusetts, where we're working on this house right here, built in 1896, and working for a family of five that's lived here for about seven years or so.
And that entire time, they've been thinking about the renovation, how to reconfigure the floor plan, and what addition they could put on.
Well, now that they made that decision, the first order of business was for Charlie to get some heavy equipment into the backyard so that he could start excavating for a 600-square-foot addition.
We had to move an old river birch tree out of the way and pull up an adjacent brick sidewalk.
That work was done by Jenn and Mark and the homeowner's teenage son, Brendan.
Jenn: Look at you.
Professional.
Kevin: But today, it's all about demo.
So I'm headed inside to see what Pops has gotten himself into.
You can see down here on the first floor, the original floors were pulled up, 'cause these are getting replaced.
[ Power tool whirs ] Hey, Tommy.
-Tom: Hey, Kevin.
How are you?
Kevin: Doing alright?
Looks like you got started.
Tom: Yeah.
Well, the homeowners had a good idea that they could use some of these cabinets in the new pantry.
-Kevin: Right.
Tom: So the architect took some measurements, and he marked "save" on all the cabinets that he thought would fit into that area.
So I started by taking down this cabinet here.
Took down the hood this morning, and the stove got moved outside, out of the way.
So, Greg helped me with that.
Kevin: So, how do you feel about the idea of reusing them?
Tom: I think it's a great idea.
Whenever you have cabinets in this condition -- I mean, they're in beautiful shape, the cherry, with the birch veneer inside.
No sags in any of the doors.
-Kevin: Yeah.
Tom: Everything looks pretty even.
Great.
-Kevin: First time I saw them, I was shocked that they were 30 years old.
-Tom: Can you believe it?
-Kevin: Yeah.
So, alright.
I'll give you a hand.
-Tom: Alright.
We'll get started by separating these pieces here.
The first thing I want to do is take that crown molding down.
So, we needed a couple of different-sized flat bars.
A chisel is always good to get in behind the crown molding.
And a couple hammers.
Pull that right out.
Alright.
You got it there, sonny?
Kevin: I do.
Thank you.
Tom: Alright.
[ Drill whirs ] -Kevin: I got one nail in there.
Tom: Yeah.
I'm gonna snap this.
There you go.
You got it.
[ Drill whirring ] Alright.
[ Mid-tempo music plays ] ♪♪ No.
Not gonna get it.
Right up.
♪♪ Alright.
So, this cabinet has three screws in it into a stud.
So when you're taking a cabinet down so it doesn't fall on you, a couple of things that I like to think about.
First of all, how heavy is it?
If it's too heavy, then I make up a little frame with a leg, which I used over here.
And it's just out of some scrap wood that fits underneath the cabinet.
And you put it in there so it's under the front so the cabinet doesn't fall forward on you.
And, then, now what I'm gonna do is I'm just gonna take the bottom screw out.
[ Drill whirring ] -Alright.
-I've already loosened the middle screw.
That way, I know it's gonna come right out.
Now I'll go up and take the top screw out.
[ Drill whirs ] [ Drill whirring ] -Kevin: Alright.
-Tom: Now, because this cabinet is so small and so light, I can just fold it down... ...break that seal at the bottom, carry it away.
[ Drill whirring ] The wire comes, feeds right into the back.
These are really tiny screws, so this comes right up.
The lights aren't gonna be reused.
Power is off, so we can just cut the wire.
Kevin: There you go.
[ Laughing ] Tom: If you see a flash, then the power's not off.
Kevin: Wire cutter.
You run, I run.
Tom: End nippers -- fantastic for pulling nails.
Alright.
So, we got that out of the way.
We got the shelves out.
So now I get my temporary leg and put it in here.
Probably about a third of the way it back.
Because if the weight comes down, if I put it back here, it could pivot and then roll right far.
So put it here.
Hopefully it keeps the cabinet at the top against the wall as it comes down.
Then we can just roll it off of that and carry it away safely.
Time to pull out all the screws.
[ Drill whirring ] [ Mid-tempo music plays ] ♪♪ You got it?
Kevin: Alright.
That's free.
♪♪ Tom: Alright.
Now we're on the... There we go.
You good?
♪♪ Kevin: It's just gonna come up.
Tom: So, I'd like to get it up, but then I got to get it that way.
I got to get it out from under the tile.
So let me get this bottom-row tile up.
♪♪ ♪♪ ♪♪ Pick it up just a little.
I can get under it here.
♪♪ There it is.
Okay.
♪♪ ♪♪ Hey, why don't you just put it right up on top of the cabin, and we can put that in the barrel.
♪♪ [ Drill whirring ] ♪♪ ♪♪ Alright.
Kevin: There we go.
♪♪ That looks pretty good.
You can definitely reuse these.
-Tom: Absolutely.
Clean them up, paint them, whatever you want to do.
But they'll look brand-new when they're in.
[ Down-tempo music plays ] ♪♪ Charlie: All set.
[ Crane beeping ] ♪♪ Well, the architect's plans calls for this chimney to come all the way down through the first floor.
Mark: Okay, so, Charlie, the first thing I noticed is this is actually a rebuild.
And the way I can tell is I can look at this brick.
It's called a 53-DD.
It's only been around for 40 or 50 years.
And another thing -- I see some things I don't like.
You can see these head joints.
They're a little bit too wide.
They let water in.
That's a problem.
You can see the moss that's actually growing all the way around the chimney -- another indication that we're taking in way too much water.
Charlie: When do you want to get started?
Mark: What we're gonna do is we're gonna start with this cap removal.
We're gonna use some unconventional tools.
You can see this is a railroad spike.
But the reason I like it is because it has a flat part right here.
And that bevel is actually gonna help me get under the bed joint and under the brick.
I'm gonna be able to pry it up off of that bevel.
I'm gonna work myself all the way around and then down.
-Charlie: Alright.
-Mark: The next tool that I'm gonna use is a flat chisel.
This is gonna help me get under this metal cap, pry that up.
And that's the first thing that we're gonna do is remove this.
-Charlie: Alright.
Why don't I hold onto it and you hit it?
-Mark: Okay.
-Charlie: On there good.
-Mark: Yep.
But coming up, coming up.
♪♪ There you go.
-Charlie: Here we go.
-Mark: Alright.
Got that, Charlie?
-Charlie: Yep.
So, there's two flues here.
One was probably for the heating.
-Mark: Yes.
-Charlie: Other fireplace right?
-Mark: Exactly.
Way to go.
Let's get them out.
Alright.
So let's make a trip down and come right back up.
-Charlie: Sounds good.
[ Crane beeping ] ♪♪ Alright.
So, some of these we can drop down through the flue.
Mark: Sure.
You know what?
Let's see how it works.
Ba-Boom.
-Charlie: Success.
Mark: Well, hopefully, we don't even have to use the buckets.
♪♪ Now, as we know, Charlie, the lead flashing is only up here to protect the counter flashing.
Charlie: That's right.
Mark: A lot of people think that the lead flashing is meant to keep water out.
Which it does partly.
But its main function is just protecting the roofers' flash.
Charlie: That's right.
I can play for the Celtics.
So, Mark, this is a piece of flue from the two sections we've already taken out.
This is clearly in great shape compared to the existing flue.
-Mark: Right.
-Charlie: What do you think?
-Mark: Alright.
So, it's just more indication that this chimney at one point, probably in the '80s, came down to the roofline.
And that's where they started the new flue rate here.
You can see the decay, indicating age.
And, then, as it came back up with the new brick, we put new flue tile in.
And that's what you have in your hand.
In my eyes, I do see 40 or 50 years' worth of soot and grime on that new flue.
Charlie: Alright.
That makes sense.
[ Mid-tempo music plays ] ♪♪ Mark: Alright, Charlie.
Look at this.
That's just a chunk of mortar of what we've just taken out.
You can see how gray it is.
-Charlie: Yeah.
Mark: That's actually Portland cement mixed with lime and sand.
But as we got lower into the roofline where the old work existed, but look at the stuff that we've taken from the 1800s.
-Charlie: Clear difference.
-Mark: Clear difference.
This is a heavy, lime-based mortar.
The advent of Portland cement was probably 1920.
Charlie: And it was in good enough shape to add on to it.
You didn't have to bring it all the way down.
Mark: Exactly, exactly.
Great point.
-Charlie: So, we're almost through the roofline now.
-Mark: Okay.
Charlie: We're gonna work our way through the little attic space and down in through the other floors.
Mark: Alright, Charlie.
So, what's the plan?
Charlie: Typically, we would build a wood box, and you'd veneer.
-Mark: Yeah.
-Charlie: But not in this case.
It's not in the budget.
-Mark: Okay.
-Charlie: But I have bigger plans for this access point.
We're gonna use it to get in here to insulate this whole roofline of the attic, because our heating system is gonna live in this space.
And that way, we can keep it temperature-controlled.
Mark: Alright.
Well, I hate to say it, but another chimney bites the dust.
Charlie: Yeah, but it did have a good life.
Mark: Sure did.
[ Rock music plays ] [ Conversing indistinctly ] Oh, whoa!
Alright, look.
[ Laughs ] A chocolate bar from the 1980s, which is typical.
A mason such as myself, we'll put keepsakes into a rebuild, and when something like this happens... -Charlie: Very cool.
-Mark: ...they're gonna find them.
♪♪ Alright.
Let's head inside.
-Charlie: Let's go.
♪♪ Alright.
Well, we've made quick work of coming through the attic, and now we're in the third-floor bedroom.
Mark: You can see, Charlie, that we still have the same mortar, so it's making it pretty easy for us.
We're just gonna keep cracking, and we'll be done.
-Charlie: Alright.
-Mark: Let's go.
Alright.
Thanks, Charlie.
[ Rock music plays ] ♪♪ ♪♪ Now that we brought the chimney down through the third floor, we'll move down to the second floor.
♪♪ ♪♪ You know, Charlie, I thought we needed a bigger boat, but I think we need bigger buckets.
Charlie: We do need a lot of them.
You know, this is gonna add about four extra square feet in the laundry room on the second floor, which means you're gonna be able to put a sink in here now.
Mark: Okay.
That's good.
Charlie: Alright.
Let's get moving.
Mark: Let's keep at it.
♪♪ Hey, Charlie.
We hot enough yet?
Charlie: Hot enough?
I will say one thing -- it looks like we've had a good day's work, right?
Mark: Guys like us love to work like this anyway.
So, check this fireplace out, though.
Charlie: We do.
So, the homeowners told me this fireplace was redone about in the '90s.
So what do you think the backstory?
Mark: So, the backstory is kitty-corner fireplaces, back in the '90s, for whatever reason became very trendy.
But I'll tell you what grabs my eye, Charlie, is this big lump of stucco right here.
Beyond that stucco is all the mechanics of a fireplace.
So you have your smoke chamber, your smoke shelf, your throat.
Everything's involved right here.
And they just stuccoed it like crazy because they didn't want any smoke to leak out.
Charlie: And it looks like it worked.
Mark: Looks like they did a good job, because I don't see any smoke coming out of the stucco.
It is in front of us right now.
It's the last one we have to demo, the last floor.
So we might as well get at it so we can get out of here.
Charlie: Alright.
Let's do it.
Mark: Alright.
Let's do it, Charlie.
[ Rock music plays ] ♪♪ ♪♪ ♪♪ ♪♪ Kevin: Marcus, nice to meet you.
-Marcus: Kevin, how are you?
-Kevin: I'm well, thank you.
So, architect of record for us.
And I also am told that you had a hand in the decision to have the old chimney taken out.
Marcus: Yes.
Working with Patrick and Liz over the last six months has been exciting, creating the new vision for their house.
This had to go.
This gives us 40 square feet across the whole house by doing this.
Kevin: And so what is it that they asked you to do, the things that were on their list?
Marcus: So, less crowding in the small rooms around when they're entertaining.
-Kevin: Yeah.
Marcus: And just generally they wanted to create a new formal dining room over here.
Kevin: So this was the old living room?
Marcus: The old living room.
We're making it a more formal space.
They're not gonna use it that much.
-Kevin: Right.
-Marcus: But we will -- Even though we took that fireplace out, we're gonna put a new one here which vents directly to the outside.
Kevin: So you're creating a wall right here, you're basically saying, yeah?
-Marcus: Roughly, yeah.
Yep.
Roughly there.
This then allows us to create a new living room through here.
Kevin: Wall comes down, correct?
Marcus: This wall comes down.
-Kevin: Yeah.
-Marcus: Opening up this space.
-Kevin: So this was the old dining room?
-Marcus: Yes.
Kevin: Now it's the living room.
Marcus: So we switcheroo.
We're gonna take this wall out, as well.
She very much likes this piece of the house.
-Kevin: Can't blame her.
Marcus: We're gonna use that over there in the formal dining room.
Kevin: Right.
And you're putting a beam in?
Marcus: Yes, which runs from the rear of the house to the front.
The room's 22 feet long, 17 inches deep.
Very significant.
Weighs a ton.
Kevin: So, but it can carry all the way to -- Marcus: It will carry the load of the house.
Kevin: Okay.
So now this sort of new family room is open to the kitchen, because you said that wall comes down.
We did a little work in here this morning.
We're gonna save some of the cabinets.
It was a pretty nice kitchen.
I mean, the cabinets looked great, and the only knock was too small and not very open.
Marcus: So, we can't expand on either side, due to setback issues.
-Kevin: Can't go this way?
Okay.
Marcus: So our opportunity is out back.
Kevin: That's our addition?
Marcus: We're making a three-story addition.
But out back, we're adding 200 square feet on this floor.
So it allows the kitchen to be much bigger.
We'll have an open plan and an island here as a division between the living room and the kitchen.
Kevin: Opens everything up, because that's the way people live today.
-Marcus: Correct.
-Kevin: So final question are these.
You know, quaint, but we know we could fix that.
Why are they still staying?
Marcus: Well, we did try and convince Liz and Patrick to get rid of that.
No one really liked it.
It was kind of a barrier.
But Liz likes it.
So they're part of this old house, so we decided to keep them.
Kevin: You had me at that, Marcus, I appreciate it.
Look forward to working with you.
Marcus: Absolutely.
[ Mid-tempo music plays ] ♪♪ ♪♪ ♪♪ ♪♪ [ Beeping ] ♪♪ ♪♪ ♪♪ -Kevin: Charlie!
-Charlie: Kevin.
Looks like we got some concrete work going on, huh?
Charlie: Come on down here where the action is.
Kevin: What's the scope of this whole thing?
Charlie: So, the other day, we poured our footings.
There's nine yards of concrete in the footing and a lot of rebar.
Then they set our foundation forms and are pouring them now.
After that sets, tomorrow, they will strip all of these forms.
And you see what we discovered here during excavation.
This is not in good shape and can easily fall in on us.
So we cannot leave it like that.
Kevin: You knew it was gonna be rubble soon, but you didn't think it was gonna be this bad?
Charlie: It was great shape inside, and it's about as bad as you can get on the outside.
Kevin: So what do you do about it?
Charlie: So, all the rebar's in the footing, and we're gonna pour a 10-inch wall up to the bottom of this window here -- 10 inches thick, all the way around.
And that will retain it all.
Kevin: So basically form on this side and let the concrete push into this?
-Charlie: That's right.
-Kevin: Oh, very nice.
So, this is for the addition, 600 feet, right?
Charlie: Yeah.
200 in the basement, 200 in the first, 200 on the second.
Kevin: Which means that if this is basement, do we want to connect it to the old basement?
Charlie: We do.
And we've always planned on using this basement-window opening 'cause it already has a header in it, and we saw-cut it.
We would have saw-cut it first if the stone was in good shape.
If we saw-cut this, it's just gonna fall in on us.
Kevin: Yeah.
I mean, you can see when I came up, that it's basically -- I mean, you can look right through there.
Charlie: Oh, yeah.
It's in bad shape.
So, once this is poured, we're gonna get our friend Ben in here and saw-cut it right down.
-Kevin: Ah!
Charlie: And, then, that will be our new opening.
Kevin: Ben with the big blade.
Charlie: Ben with the big blade.
Kevin: I love it.
Okay.
Well, truck is here, so let's go see how this is going.
Charlie: Sounds good.
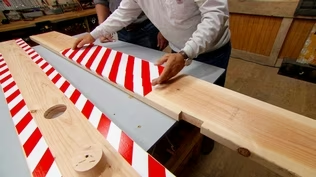
[ Mid-tempo music plays ] ♪♪ ♪♪ ♪♪ ♪♪ ♪♪ Kevin: After the one-sided concrete pour against the existing foundation was set, it was time to saw-cut through both the new concrete and the old foundation to create a doorway that connects the basement with the new addition.
A stonecutter then used a series of four different-sized diamond blades, ranging from 32 to 54 inches.
♪♪ Once the opening was complete, Mark came in with mortar and hand tools to fill in any gaps for a smooth, cohesive finish.
♪♪ Alright.
Nice to finally have this project under way, right?
Charlie: Oh, it feels great.
Kevin: And this makes a huge difference, taking it down.
Charlie: Makes a huge difference.
All the floors, all the way up.
You should have saw what we looked earlier.
Mark and I got filthy doing this.
But, change of clothes, as good as new.
-Kevin: You look marvelous.
-Charlie: Thank you.
Kevin: Alright, so what's coming up next time?
Tom: Well, now that we get the kitchen cabinets started to clear out, we're gonna start removing some of these interior walls and really open up this first floor.
-Kevin: Nice.
-Charlie: And we'll be framing the new addition.
Kevin: Alright.
Well, all that next.
So until then, I'm Kevin O'Connor.
-Tom: I'm Tom Silva.
-Charlie: And I'm Charlie Silva.
Kevin: For "This Old House" here in Needham, Mass.
Kevin: Next time on "This Old House"... Charlie: Homeowners decided to change the aluminum siding.
And I'm gonna be honest with you, I'm not sorry to see it go.
Kevin: Then, we'll see what happens to that siding after it leaves the jobsite.
[ Mid-tempo music plays ] ♪♪ Tom: And we're installing a new I-beam.
It's about 3,500 pounds.
We're gonna jack it up and bolt it in place.
[ Drill whirring ] Kevin: That's next time.


- Home and How To

Hit the road in a classic car for a tour through Great Britain with two antiques experts.


Support for PBS provided by:
Funding for THIS OLD HOUSE is provided by The Home Depot and Renewal By Andersen.